Sections can be manipulated and styled either via the options in the Elementor Panel on the left or by right-clicking the Section handle and choosing from the context menu that pops up. ![]()
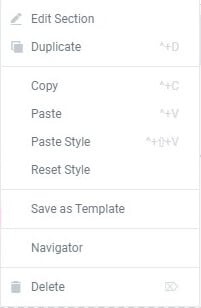
Right-Click Options
If you wish to duplicate a section, right-click a section handle and choose Duplicate from the context menu. You can also copy and paste a section elsewhere using Copy and Paste options here, or you can copy and paste only the style (without the content) from one section to another. Click Save as Template to save the section as a template that can be inserted anywhere later. Clicking Navigator here will open the Navigator already set to that particular section. And of course, clicking Delete here will delete the section.
If you click Edit Section, the column’s options will be displayed in the Elementor Panel to the left with all of the following options available to you.
Layout
- Content Width: Set the Content Width to Boxed or Full Width. When choosing Boxed – use the slider to set your width
- Columns Gap: Set your Columns Gap
- Height: Choose between Fit to Screen: Your section will fill the screen, and Min Height: Set a Min Height, and use the slider to set your section height
- Vertical Align: Set your Section content’s vertical alignment
- Overflow: Select how to handle content that overflows its container. Default allows the overflow. Select Hidden to hide the overflowing content.
- Stretch Section: Force the Section to stretch to the full width of the page
- HTML Tag: Set an HTML Tag for your section. Learn more about HTML Tags
Style
Background (Normal & Hover)
- Background Type: Choose between Classic (which allows you to set a background color or image), Gradient (allowing you to set a color gradient background), Video background, or an image Slideshow background.
Background Overlay (Normal & Hover)
- Background Type: Choose between Classic or Gradient
- Blend Mode: Set a Blend Mode
Border (Normal & Hover)
- Border Type: Set a Border Type
- Border Radius: Set your Border Radius
- Box Shadow: Add a Box Shadow
Shape Divider (Normal & Hover)
- Type: Click the dropdown to choose your Shape Divider style
- Color: Pick a color
- Width: Set the width of your Shape Divider
- Height: Set the height of your Shape Divider
- Flip: Flip the direction of your Shape Divider
- Bring to Front: Force your Shape Divider to be in front of other objects
Learn more about Shape Divider
Typography
- Set Typography Colors for the section
Note: The ‘Set Typography’ colors won’t work if Default Colors are enabled.
Advanced
Advanced
- Margin: Set the section Margin
- Padding: Set the section Padding
- Z-index: Set the Z-Index. Learn more about Z-Index
- CSS ID: Set an CSS ID for your section
- CSS Classes: Set CSS Classes for your section
Motion Effects (Pro users only)
- Sticky: Set your section as Sticky, and choose between Top or Bottom. Learn more about Sticky
- Scrolling Effects: Set Scrolling Effects to On to choose from a variety of animations and interactions that can occur when the user scrolls through the page. Learn more about Scrolling Effects
- Entrance Animation: Click the dropdown to choose an animation. Learn more about Entrance Animation
Responsive
- Reverse Columns: Slide to reverse your columns order (Great for Mobile)
- Visibility: Show or Hide your section on Desktop, Tablet, or Mobile
Attributes (Pro only)
- Add your own custom attributes. Learn more about Custom Attributes
Custom CSS (Pro only)
- Add your own custom CSS
Get more details about the structure and layout of the Elementor Editor.